Wednesday, January 27, 2010

Chocolate and caramel tartlets

Chocolate cream tart.

My name is Agnieszka and I am a chocoholic. Quite an intimate confession, isn't it?  ;) Sadly, in my case, it is rather a serious addiction.  It can be as strong as nicotine or alcohol. I wonder if there are any Chocoholic Anonymous because I suppose I'm not the only one in the clutches of addiction.

In contrast to people who are satisfied with only one cube of dark chocolate (70% of cocoa solids at least) per day, I worship milk chocolate. When it melts in my mouth I am in heaven. Unfortunately, I can only satisfy my desire with an ever increasing quantity.

What is really funny - I'm not very fond of chocolate flavour in other sweets. Chocolate ice cream does not tempt me at all. Once a year I have a craving for a nice Portuguese chocolate mousse. As far as chocolate cakes are concerned I'm extremely picky and demanding. Here I agree with the "not worth the calories" concept. What does this strange term mean? Well, it's quite simple: if you take a diet break and you want to devour something hypercaloric you better choose a food that promises you a culinary ecstasy.

And there are some chocolate pastries that can lead me to nirvana. Today's tartlets reflect my passionate desire for a decent chocolate creation. They are perfect for a party because you can make them in almost no time if you bake the crust shells one day ahead.

So close your eyes, forget about calories and enjoy a creamy chocolate filling with a delicate caramel aftertaste, all of this inside a crunchy hazelnut crust.


Chocolate caramel tartlets

Chocolate and caramel tartlets

12 small or 6 medium tartlet tins

Hazelnut crust:
210 g all-purpose flour
30 g hazelnuts, chopped
2 tablespoons sugar
125 g cold butter, diced
1 egg yolk
1-2 tablespoons ice cold water (optional)

Filling:
50 g light brown sugar (my favourite is rapadura)
20 g butter
60 ml single cream or half and half (12% fat)
150 g dark chocolate, coarsely chopped
60 ml whipping cream (35% fat)
3 tablespoons hazelnuts, toasted and coarsely chopped
1-2 tablespoons dark cocoa powder

Hazelnut crust:
  Put flour, nuts and sugar into a food processor. Pulse a few times until you get a finely ground mixture. Add the butter and process until the mixture begins to resemble crumbs. Now add the egg yolk and pulse until the dough forms a ball (you may need to add some ice cold water). Flatten into disk, wrap in plastic and chill in the fridge for 30 minutes.

Preheat the oven to 190ºC (375ºF).
Roll out the dough on lightly floured surface (silicone pastry board is excellent for that purpose) to 2/3cm thick. Press the dough onto bottom and up sides of buttered and floured tartlet pans. Prick the dough with a fork. Bake until golden brown for approximately 8-12 minutes. Leave to cool down on rack. Carefully take out the pastry shells from the pans.

Filling:
Put chopped chocolate in a heatproof bowl. In a saucepan, heat the sugar, butter and liquid cream. Stir until sugar dissolves and bring to a boil. Continue cooking on low heat for 2 minutes without stirring. Pour hot liquid on chopped chocolate in the bowl and mix until it dissolves. Add the whipping cream and mix again thoroughly. Leave to cool, then put in the fridge for 10 minutes. 

Pour the filling onto completely cooled crust shells. Sprinkle with chopped hazelnuts and cocoa.


Saturday, January 23, 2010

Arrufadas or bread rolls from Coimbra

I have to confess that I am not particularly fond of Portuguese pastries and bread. Perhaps it is because of my Polish roots. I used to eat dark wholegrain bread and here in the Iberian Peninsula, we have mainly the white. I love elaborate cakes with fruits, layered with whipped cream or full of spices.  Portuguese bakers do not need much more to make a cake than one thousand eggs, a tonne of sugar and maybe some flour. ;) Pastries and cakes are always wildly yellow and often covered with some ovos moles (a kind of paste made with yolks and sugar, of course).

Here, in Lusitania (as they sometimes call Portugal), the food is usually rather simple, which definitely does not mean tasteless. The local cuisine puts more stress on the extraction of flavour from a specific, high-quality product, than on the complex marriage of flavours and culinary techniques. Fortunately we don´t lack fresh fish, seafood, good wine or cheese. The Portuguese coffee is excellent as well.

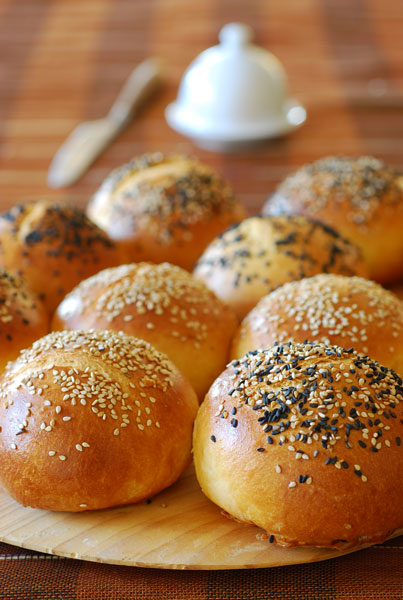
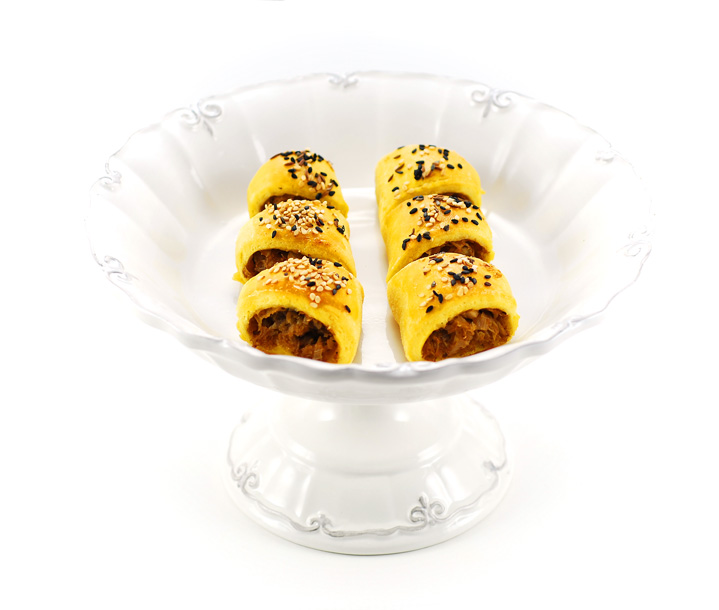
Occasionally you can also find something very tasty in the realm of sugar and eggs. My last discovery is called arrufada (from the Portuguese arrufar for sulk, fuss, get angry). These are sweet buns usually sprinkled with sugar. But do not worry! The buns are not so fussy as their name suggests. I suppose this funny name comes from the little picky eaters. These sweet arrufadas are sometimes the only thing kids want to eat!

In the past these sweet bread rolls were eaten mostly on festivals, fairs and were very popular during Easter. Today you can buy them in almost every bakery in Portugal.

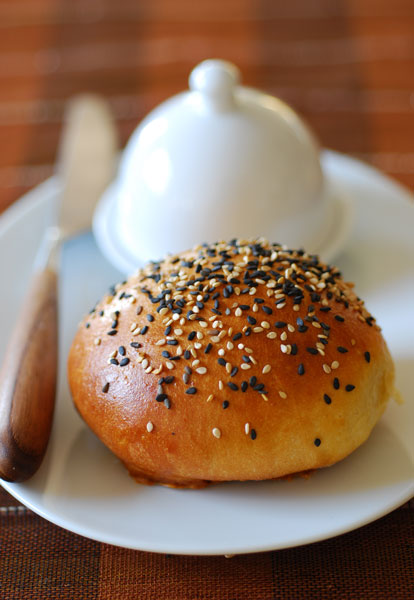
We love to eat fresh sweet bread for breakfast, so I decided to give them a try. It proved to be a very interesting recipe, although my idea of adding some sweetened condensed milk changes a little the "all-Portuguese" original. The crust is nicely browned and very delicate. The crumb is light, sweet, rich in flavour and, of course, as befits a Portuguese roll, intensely yellow. ;)

Arrufadas come from Coimbra, the city famous for its university - one of the oldest in Europe (est. 1288 A.D.). In the South of Portugal the buns are almost always sprinkled with sugar but in the Northern part of the country you can also find some coconut on the top. But most of Portuguese people will call the latter version pão de deus (divine bread). To avoid excessive sweetness I sprinkled my bread rolls with black and white sesame seeds.
Sweet bread rolls from Coimbra 
(Arrufadas) 

Wet ingredients: 
50 g (1.75 oz) butter, melted 
75 ml (2.5 fl oz) milk, warmed 
3 eggs, slightly beaten 
200 g or 150 ml (5 fl oz = 2/3 cup) sweetened condensed milk 

Dry ingredients:
500 g (17.5 oz) white wheat flour type 65 (you may substitute it with bread flour)

grated peel from 1/2 lemon 
25 g (1 oz) light brown sugar
1/3 teaspoon salt
2 and 1/2 teaspoon dried yeast

Topping:
1 egg, beaten with 3 tablespoons of single cream (10% fat) to brush the top
sugar or white and black sesame seeds to sprinkle

Sift all the dry ingredients. Put in a bowl and make a well in the middle. Pour all the wet ingredients into it. Mix in the bowl and then knead on the counter until you have a smooth and elastic dough. You may do all of this in a bread machine on "Dough" cycle. Cover the dough and  leave it to rise in a warm place until it has doubled in volume.

Turn the dough out onto a lightly floured surface. Slightly flatten it with the palms of your hands, form a long roll, and divide it into 12 equal portions. 
Form each piece into a roll (here I found an excellent tutorial). Put the rolls seam side down on the baking paper and leave to rise to double in volume again (it takes about 40 min). 
In the meantime, preheat the oven to 180ºC. Brush the rolls with a mixture of egg and cream and sprinkle with sesame seeds or sugar. Bake until they are golden brown for about 25-30 min.


Thursday, January 21, 2010

Triple chocolate cheesecake


First cheesecake this year. My "cheesecake monsters" (my husband and son) were already craving it so much I had to make it.  

This cheesecake is made of three chocolate layers.  Dark chocolate gives it an intense flavour that stays in contrast with subtle milk and white chocolate fillings. I used German quark (fresh and soft curd cheese). It is called topfen in Austria, serek homogenizowany in Poland, queijo fresco batido in Portugal or fromage frais in France. Quark can be easily substituted by cream cheese (because the latter is thicher you should add 3 extra tablespoons of sour cream to the filling).  


Triple chocolate cheesecake
 

23 cm (9 inches) spring cake pan


Crust:
150 g (5.5 oz) chocolate cookies
50 g (about 3 tablespoons) butter, softened


Filling:
1 kg (35 oz = 2.2 pounds ) quark cheese (20% fat content)
150 g (5.5 oz = 2/3 cup) sugar
25 g (about 3 tablespoons) cornstarch

4 eggs
150 ml (5 fl oz = 2/3 cup) sour cream
1 tablespoon vanilla extract

100 g (3.5 oz) dark chocolate
100 g (3.5 oz) milk chocolate
100 g (3.5 oz) white chocolate
4 tablespoons single cream (15% or more fat content) 


Crust:
Preheat the oven to 180ºC. Crush cookies with butter in a food processor to make fine crumbs. Press the crumbs onto the bottom of spring cake pan (previously lined with baking paper or aluminium foil, just to be sure that nothing leaks through) with the aid of the bottom of a cup. Bake for 10 - 12 min.


Filling:
Beat cheese with sugar and cornstarch until smooth. With the mixer still running add eggs one at a time, then sour cream and vanilla extract. Mix briefly, only to combine the ingredients. 


Preheat the oven to 180ºC. In 3 medium bowls melt 3 types of chocolate with single cream added, starting with white, then milk and finally dark (to white and milk chocolate add 1 tablespoon of cream, to the dark one 2 tablespoons). This can be done in "bain marie" or in a microwave (I melt my chocolate at 360 W in 50 seconds, take it out and mix it energetically to melt completely). 


Leave melted chocolate to cool a little. To each bowl with chocolate add gradually about 1/3 of cheese filling(it was about 500 g of added filling to each bowl ) and whisk througoutly until smooth. Initially it may seem that you finish with lumps of chocolate in filling, but they all disappear as you whisk. 


Pour the white chocolate filling onto the cooled crust. Then, very carefully and evenly, spoon the milk chocolate filling and spread it gently to create a second layer. Next goes the dark chocolate filling and you get a third layer. 


Bake in the oven for 15 minutes at 180ºC, lower the temperature to 160°C and continue to bake for 1 hour - 1 hour 15 minutes , until it is set on the sides and a little shiny and moist in the center. Turn the oven off and leave the cake to cool inside with the door slightly open.


Tuesday, January 19, 2010

Wheat bread with toasted corn flour


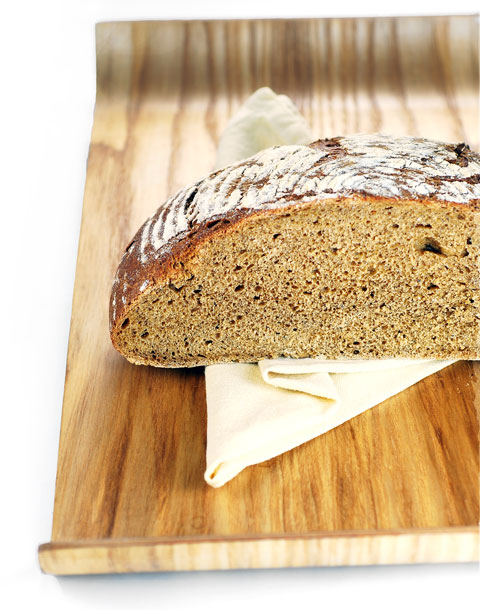
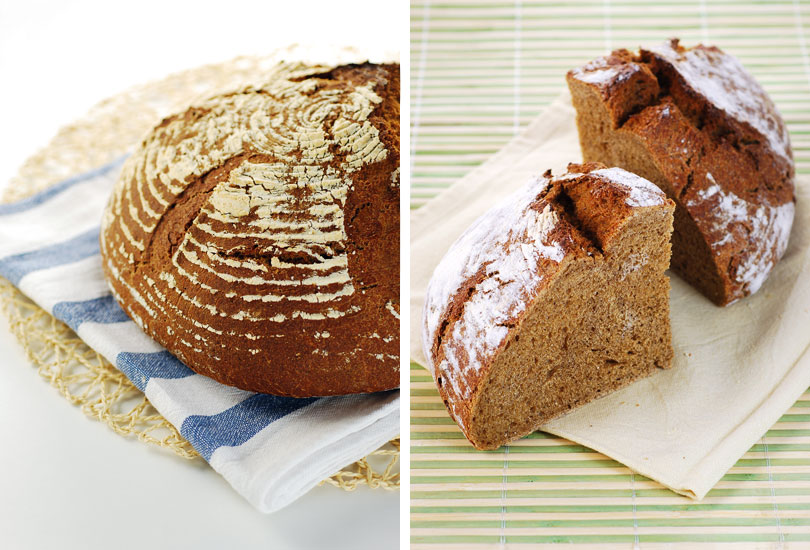
When we visited the Azores Islands I bought some local toasted cornflour. It has a beautiful toffee colour and a quite intense, albeit pleasant nutty aroma. The only problem was, I had no idea what to do with it. Well, usually if I do not know what to do with flour, I... bake bread.

I used foolproof proportions of 1/3 low-gluten flour (in this case it was cornflour) to 2/3 of wheat flour. Toasted cornflour in this bread provides an interesting flavour and bread flour keeps the crumb elastic, evenly aerated and gives some bite to the crust. As a result we get a nicely baked loaf with a scrumptious and rich toffee coloured crumb. Rye sourdough, which is added the bread, must be active and bubbling, so it is better to feed it with some wheat flour and leave on the counter for about 8-12 hours. If you want to bake bread in the morning you have to feed it the night before, but if you desire to become a home baker after work, you should nourish your sourdough early in the morning.


Sourdough wheat bread with toasted cornflour

Sourdough starter:
120 g (1/2 cup) liquid rye sourdough starter (150% hydration)*
80 ml water, lukewarm
60 g bread wheat flour

Bread dough:
250 ml water, lukewarm
45 g (2 tablespoons) molasses
30 g (2 tablespoons) butter, softened
430 g bread flour
65 g toasted yellow cornflour **
65 g of yellow cornflour
1 and 1/3 teaspoon salt
1 and 1/4 teaspoon dried yeast


Sourdough starter:
Mix your sourdough starter with water and flour and leave on counter for 8-12 hours

Bread dough:
After that time, add to your active starter 250 ml of water. Melt molasses and butter on low heat or in microwave and add to the starter. Pour this liquid mixture into the rest of mixed dry ingredients and knead a soft dough (adjusting the quantity of liquids or flour if necessary). All this can be done in bread machine on the "Dough" cycle.


Allow the dough to rise and double in volume (it usually takes about 1 hour). Take the dough onto a floured worktop, flatten with your palms and shape a loaf. Leave it in well floured and covered bread rising basket in warm place for a second rise. The dough has to double in volume again. This usually takes about 30-40 minutes.

In the meantime preheat the oven to 240°C (with the baking stone inside and a shallow pan beneath it). Just before baking pour some boiling water in the shallow pan (about 2/3 cup). Put the loaf into the oven and spray it several times with water. Bake in a falling temperature for about 35 minutes (15 min at 240°C, 10 min at 220°C and 10 min at 200ºC).

* 150% hydration is liquid sourdough, made with 1 part of rye flour and 1.5 parts of water (e.g. 100 grams of flour per 150 g of water), it should have the consistency of thick sour cream

** If you can't find toasted cornflour you can toast it yourself. Just put some regular yellow cornflour in a dry frying pan, and toast it until you get a beige colour and nice nutty flavor.

Wednesday, December 30, 2009

Driving through the USA: Plantations and lemon mint julep

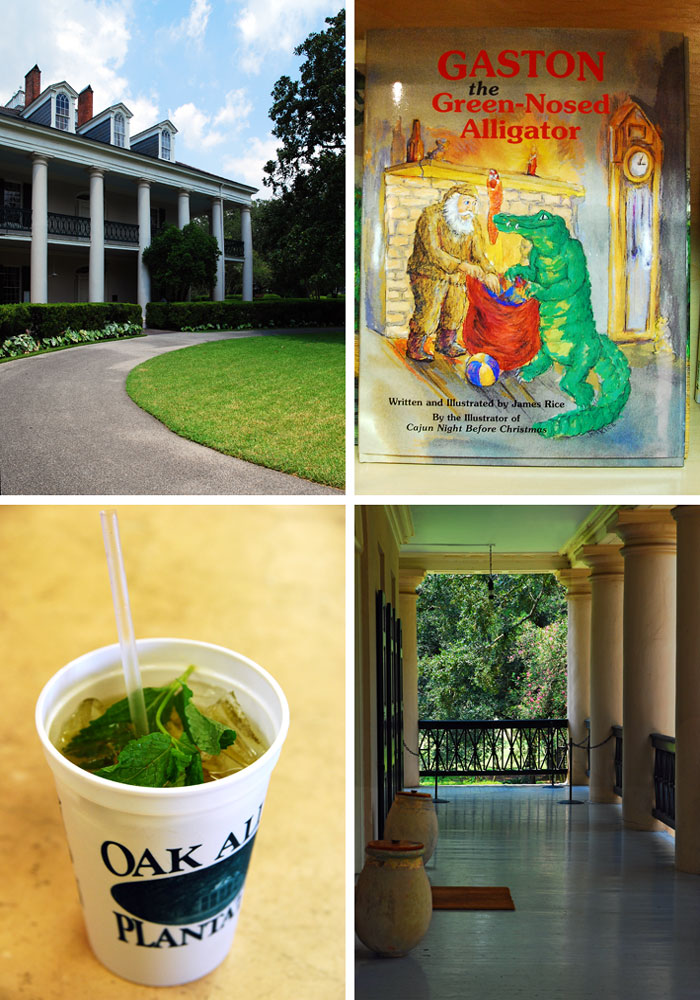
The Oak Alley Plantation.

We spend our summer holidays in the States. Here is a kind of my travelogue from the Deep South.

We travel from Miami down Interstate 10 to the West along the Gulf Coast. Shortly after passing Pensacola we leave the state of Florida. Passing through the Mobile city centre we spot the USS Alabama battleship, now a museum. The ship, during the Second World War was one of US first battleships that protected convoys to Murmansk.

After half an hour we pass a large sign saying: "Welcome to Louisiana". We stop and go to the tourist information. A young American gives us a map of Louisiana. Of course, here comes a sacramental: "Where are you guys from?" question. She makes a kind of statistic counting the number of tourists coming to Louisiana. I look over her shoulder. In first place there are tourists from Texas and Florida. Looking a little nervous she
flips the pages of the book looking for Poland. Finally, she finds it and with a satisfaction on her face writes down number 3.


Every few miles street sellers offer local delicacies - hot boiled peanuts. It is not the first time we hear about growing peanuts in the U.S. However, we could never find any of these farms. Anyway, the fresh peanuts sold in the street are excellent.

An hour later we pass New Orleans. Among many downtown skyscrapers stands the Superdome - the stadium of the local NHL team Saints. It was here that in 2005, 20 000 people had taken refuge from Hurricane Katrina.

One of the many roadside stands with the local favorite - peanuts .

We leave the city behind and follow the road signs to the North-West. We cross a mighty bridge over the Mississippi River. The river is wide and strangely calm. But do not be fooled - this is the largest water way in the U.S. and the most dangerous. During the Great Flood in 1993 the river flooded an area the size of Scotland.
We cross the bridge and turn west travelling down a narrow road along the Mississippi river.
It's a poor neighbourhood. Wooden houses are inhabited mainly by the Afro-American families. The road turns and twists indefinitely. Finally we arrive at our destination. The Oak Alley Plantation.

This is one of the most beautiful estates in the southern U.S. Built in 1839 in Greek Revival style by a family of French descent, it is located on a giant sugar-cane plantation.
In the eighteenth and nineteenth centuries sugar export to Europe gave the owners enormous profits. Sugar producers belonged to the elite of the financial world. Oak alley, now nearly 300-years-old (planted 100 years before the construction of the house), leading from the main building to the bank of the river, has breathtaking views.
We wander through the park.
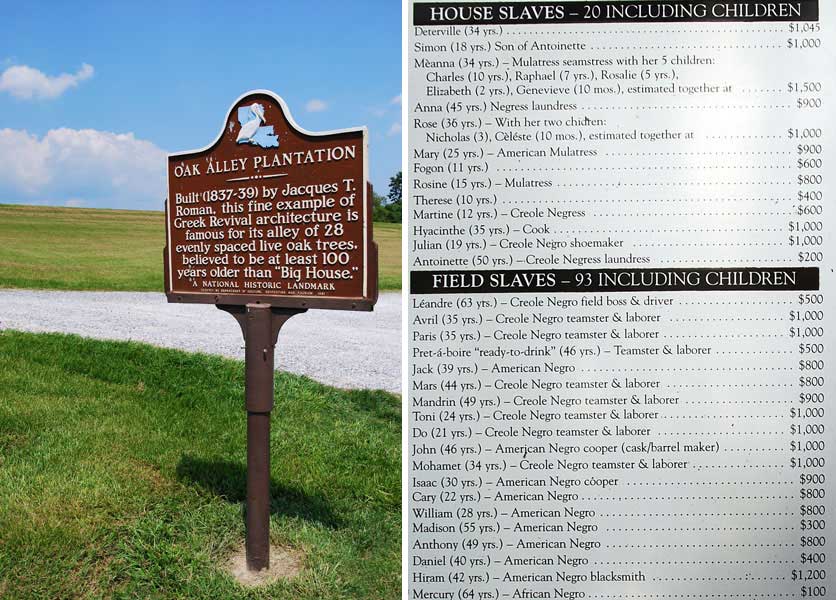
It is hot and humid. The place where the slaves used to live now has a commemorative plaque with dozens of names. We learn that a family of slaves used to cost a few thousand dollars. A young slave cost $ 1,000 and an old slave was rather cheaper , only $ 100.
..

Oak Alley Plantation. Christmas in the American South (or Cajun style) - instead of the red-nosed reindeer there is an alligator with a red nose. Mint Julep in a café on the Plantation. Shady verandas surrounding the house protect against the heat of the Southern Sun.

Every half an hour the ring of the bell is heard. In this way, the beginning of the guided tour in the mansion is announced. At this time of year (the beginning of September) there are few tourists here - so we are alone with a guide. The house interiors are confusingly similar to the aristocratic chateaux of France. It's no wonder - all furniture was imported from Europe. There were many architectural tricks designed for the soul purpose of combating hot climate: the house was surrounded by columns which supported deep, shady verandas, tall windows and doors facing each other served as an air-conditioning. Garden views from the second floor are fantastic. The owners could enjoy the views of the Mississippi steamers and sailing boats as they passed by.

Everything here reminds us of scenes from the "Gone with the Wind" movie. The history of the first owners Jacques and Celina Roman, however, is somewhat less romantic. Shortly after building the "Bom séjour" (the name initially given to the house), Roman Empire - as the Roman family fortune was called - began to sink into decline. During the Civil War the owners lived in the mansion in relative peace, but in the post-war period the master of the house - Jacques died of tuberculosis and two of his children of yellow fever. His beautiful wife, Celina, accustomed to a luxurious life and being a typical nineteenth-century shopaholic, lost every penny of their fortune. The family had to sell the Oak Alley Plantation. The last lady on Oak Alley Plantation - Mrs. Stewart - created a foundation and opened her home to the public.

In the small bar near the mansion we order a mint julep drink. It has 4 basic ingredients: bourbon, mint, sugar and ice. The name comes from the Persian gulab, which originally meant rose water, and later all types of beverages with sweet syrups.
Ideally it should be served in silver glasses, on a shady veranda, as you sit in a wooden rocking chair. ;)

To tell you the truth the mint julep is terrible .... The lady at the bar warned us about it and offered me a lemon mint julep instead
but I insisted on tasting the absolute classic. The drink ended in the dustbin - a strong, disgustingly bland and sweet liquor.

However, I did not give up and decided to try the lemon juice version of the drink at home. It's almost like a mojito, but instead of lemon it contains lime and rum is substituted by whiskey. I add lots of lemon juice, much more than bourbon, and my version suddenly gets quite tasty.
According to the purists one should serve the mint julep in silver glasses. As I could not get my hands on them, I served my version in classic high-ball glasses.

Having in mind the approaching New Year's Eve, I invite you to try fresh lemon mint julep.


Lemon Mint Julep

4 servings (four 330 ml high ball glasses)

5 lemons (about 300ml of juice)
225 g sugar
250 ml water
1 / 2 bunch of fresh spearmint
crushed ice to fill glasses
160 ml bourbon whiskey

Peel the rind of 1 lemon and reserve. Squeeze juice from all the lemons. Stir water and sugar, add the lemon rind. Boil for about 15-20 minutes or until it turns syrupy. Cool, discard the lemon peel. Pour the lemon juice. You should obtain about 440 ml of liquid.

With a muddler, crush a few leaves of mint in each of the glasses. Fill it to the top with crushed ice. Pour approximately 110 ml glass of lemon syrup to each glass and add 40 ml of bourbon. Garnish with fresh mint sprigs ( you should
previously have taken some in the palm of your hand and hit it with the top of the other hand to free spearmint aroma). Serve with a straw.

Wednesday, December 23, 2009

Little pies with sauerkraut and mushroom filling


It took me a long time to perfect my recipe for these little pies filled with sauerkaraut and wild mushrooms. In Poland they are perfect accompaniment for clear soups, especially barszcz (beet soup that you may know by the Russian name borscht).
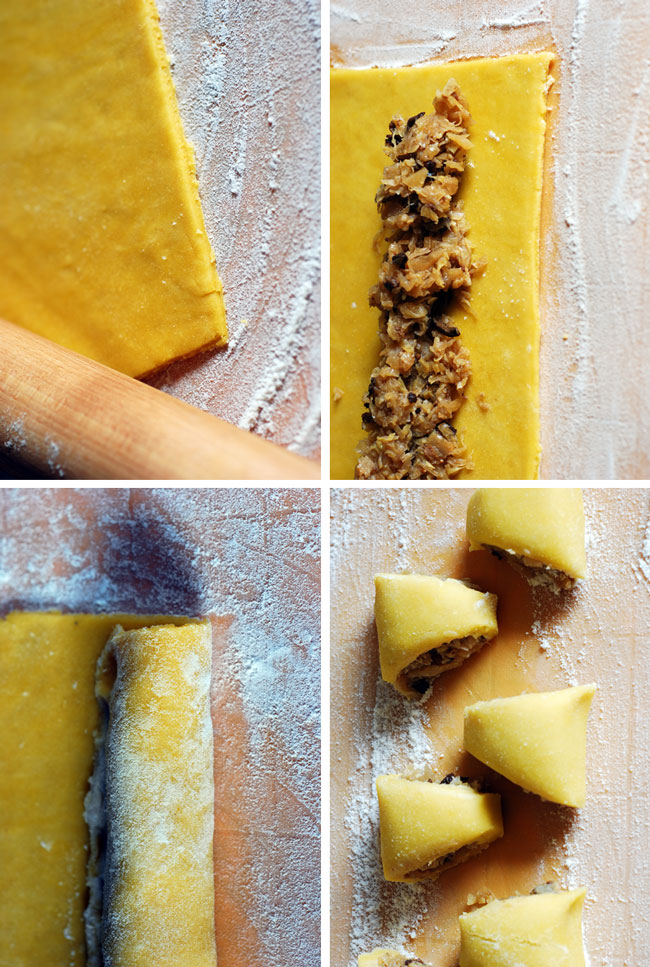
My pies are tiny, just for one bite. Here are some photos that will help you to learn how to shape them.


Little pies with sauerkraut and mushrooms
(Paszteciki z kapustą i grzybami)

about 100 tiny pies


Filling:

25g dried mushrooms

3 tablespoons butter for frying

2 large onions, finely chopped

1 medium white cabbage (approximately 500 g)

1/2 kg drained sauerkraut

1/2 teaspoon ground cumin

1/2 teaspoon crushed fennel seed

salt and freshly ground pepper to taste

fine dry bread crumbs (optional)


Buttery yeast dough:

3 and 1/4 teaspoon dried yeast

100-125 ml sour cream 21% fat (about 6 -8 tablespoons)

1 teaspoon sugar

500 g flour

1 and 1/3 teaspoon salt

200 g butter

1 egg
3 egg yolks

On Top:

1 egg lightly beaten

3 teaspoons white sesame seeds

3 teaspoons black sesame seeds

1 teaspoon cumin seeds

1 teaspoon nigella seeds

Filling:

Soak mushrooms in water for
1 hour. Boil them in soaking water until tender (about 20 minutes). Reserve about 1/3 glass of the liquid. Drain the mushrooms and chop
them very finely. Shred white cabbage very finely and cook for about 15 minutes in a large quantity of slightly salted water. Add sauerkraut and cook for another 10 minutes. Drain very well, let it cool and chop one more time. Brown onions in butter in large skillet. Add cooked cabbage, mushrooms, reserved mushroom cooking liquid, ground cumin and fennel. Fry for another 5 minutes. Season to taste with salt and pepper. If the filling is too wet, you can add a few tablespoons of fine breadcrumbs.

Buttery yeast dough:

Mix yeast with cream and sugar.
Leave for about 20 minutes or until it starts to bubble. Chop flour with butter. Add
lightly beaten egg yolks, whole egg and yeast mixture. Knead the dough quickly, like a pastry dough (it should be shiny and quite soft). Cover and leave to rise on the counter (for about 50-60 minutes) or leave in the refrigerator overnight. (If you choose to refrigerate the dough, on the next day it should be taken out from the fridge and left on the counter for about 1 and 1/2 - 2 hours until it reaches room temperature).

Preheat the oven to 180ºC.
Roll out the dough into a rectangle. Arrange a filling in form of the roll and put it 5 cm from the edge of the dough. Wrap the dough around the filling, pressing well with your fingers to seal the filling inside
. Cut off entire roll of dough with the filling and lay it on the counter (seam side down). Brush the top with egg mixture and sprinkle with sesame, caraway and nigella seeds. Cut in small triangles. Place the pies 5 cm apart on the oven tray lined with baking paper. Repeat the entire procedure with a new batch of filling.

Allow the pies to rise (usually when you finish filling your second tray the first one is ready to go to the oven).
Bake for about 20 minutes or until the pies are golden.